Day 32 - Launching your Kubernetes Cluster with Deployment (Kubeadm Multinode)


What Is Deployment in Kubernetes?
Kubernetes has auto-scaling and auto-healing features which is why it is so a famous orchestration tool nowadays. This means if you delete a pod accidentally or if a pod gets crashed for any reason it will recreate automatically within a second, this feature is called auto-healing, and this will make sure that your application won't face any downtime.
If your application gets a high load due to the number of users increasing or any other reasons, the number of pods will be increased automatically to distribute the load among them, this feature is known as the auto-scaling feature.
Both can be possible with the help of the Deployment object of k8s.
This Deployment object will make sure that in any situation current state should match the desired state that means if any pod gets deleted automatically it will create to make the desired state equal to the current state. But deployment object doesn't do it directly, it does it with the help of Replica Set[A pod Controller].
In the Replica set, we mention that number that should maintain the current state and desired state concept and also the auto-scaling feature too, if loads increase the number of pods also gets increased[as replica means a copy of something]. Inside a deployment yaml file, we mention the replica set number.
We Keep Deployment on top of pods, declare the desired state and allow the Deployment-controller to automatically reach that end goal most efficiently. A deployment allows us to describe an application's life cycle, such as which images to use for the app, the number of pods there should be, and how they should be updated.
The difference between Replicaset and Deployment is that A ReplicaSet ensures that a specified number of pod replicas are running at any given time and available too. However, a Deployment is a higher-level concept that manages ReplicaSets and provides declarative updates to Pods along with a lot of other useful features.
Types of Deployment Strategies:
Rolling Update: A Deployment object has this important feature that is, suppose you want to update your application to a newer version that means your running pods will get created into a newer version but somehow if it gets failed then also it can roll back to your previous version without facing any downtime.
A new ReplicaSet with the new version will launch and replicas of the old version are terminated systematically as replicas of the new version launch. Eventually, all pods from the old version are replaced by the new version. But it will delete the pods one by one that is the first pod will get deleted then the newer one will create.
Recreate Deployment: A recreate deployment strategy is an all-or-nothing process that lets you update an application immediately, with some downtime.
With this strategy, existing pods from the deployment are terminated and replaced with a new version. This means the application experiences downtime from the time the old version goes down until the new pods start successfully and start serving user requests. A recreate strategy is suitable for development environments, or when users prefer a short period of downtime.
Blue/Green Deployment: A blue/green (or red/black) deployment strategy enables you to deploy a new version while avoiding downtime. Blue represents the current version of the application, while green represents the new version. A blue/green deployment eliminates downtime and reduces risk because you can immediately roll back to the previous version if something occurs while deploying the new version. It also helps avoid versioning issues because you change the entire application state in one deployment.
Setting up Kubernetes Multinode cluster (kubeadm)
In this task, we will be using a multinode cluster (Kubeadm)
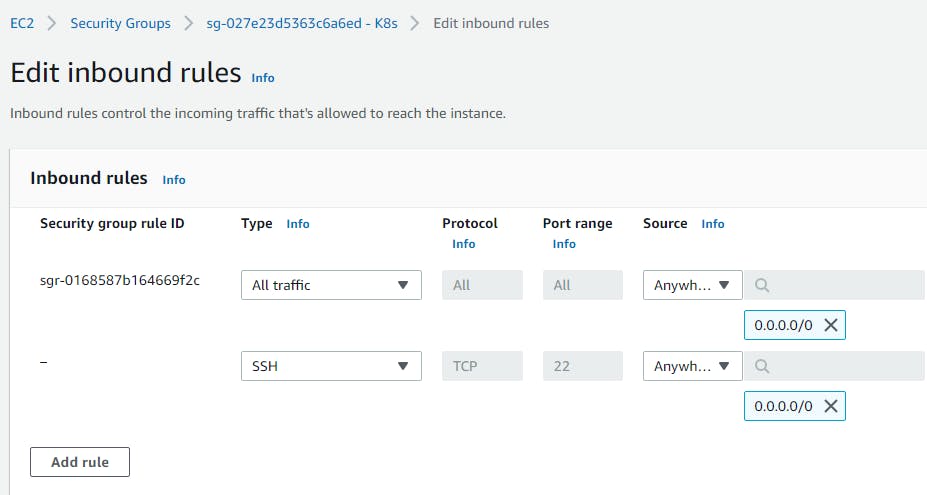
Create a Security Group with SSH and All traffic
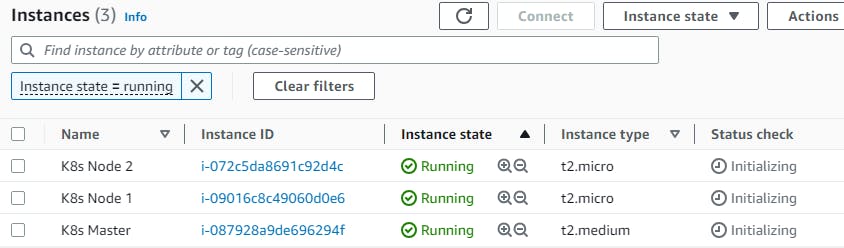
Let's create 3 Ubuntu servers using the Security Group
1 Master node (t2.medium Instance)
2 Worker nodes (t2.micro Instance)
Execute these commands on both Master and Slave Nodes
Step 1: Install Docker
$ sudo apt-get update
$ sudo apt-get install docker.io -y
$ docker --version
$ sudo usermod -aG docker $USER
$ sudo reboot
$ sudo systemctl start docker
$ sudo systemctl enable docker
$ sudo systemctl status docker
Step 2: Install K8s
# Install curl
$ sudo apt install curl

$ Add the GPG kubernetes key with the command
# curl -s https://packages.cloud.google.com/apt/doc/apt-key.gpg |  sudo apt-key add

$ To add the xenial kubernetes repository
# sudo bash -c 'echo "deb http://apt.kubernetes.io/ kubernetes-xenial main" > /etc/apt/sources.list.d/kubernetes.list'

# Install kubeadm (k8s admin)
$ sudo apt-get update && sudo apt-get install -y kubelet kubeadm kubectl

# check whether the version of the component installed are compatible
$ sudo apt-mark hold kubeadm kubelet kubectl kubernetes-cni
$ kubeadm version

# Disable swap memory
$ sudo swapoff -a
$ sudo systemctl daemon-reload
$ sudo systemctl start kubelet
$ sudo systemctl enable kubelet.service
$ kubeadm version
Only Master Node execution commands
Step 1: Running and Deploying Kubernetes
$ sudo kubeadm init
To start using your cluster, you need to run the following as a regular user:
$ mkdir -p $HOME/.kube
$ sudo cp -i /etc/kubernetes/admin.conf $HOME/.kube/config
$ sudo chown $(id -u):$(id -g) $HOME/.kube/config
$ kubectl apply -f https://github.com/weaveworks/weave/releases/download/v2.8.1/weave-daemonset-k8s.yaml
# Deploy Pod network to cluster (master)
$ wget https://raw.githubusercontent.com/coreos/flannel/master/Documentation/kube-flannel.yml
$ sudo systemctl restart kubelet.service & kubectl get nodes
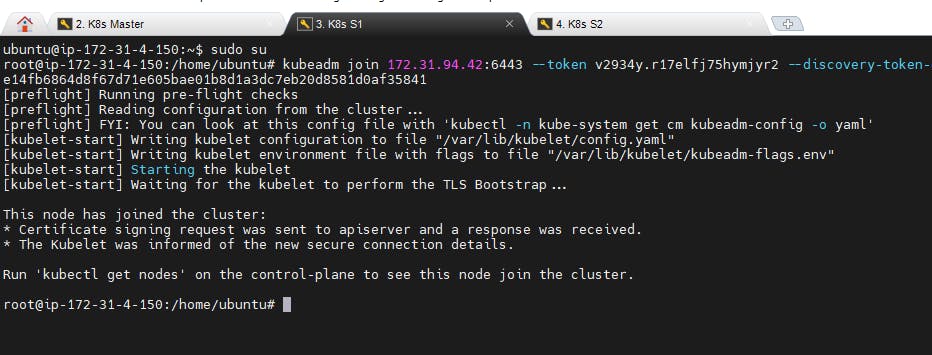
# Exc this command in master & paste the token in worker as root user
$ sudo kubeadm token create --print-join-command
$ sudo systemctl restart kubelet.service & kubectl get nodes

Execute the command sudo kubeadm token create --print-join-command to generate a token

Slave node commands
$ sudo su
$ kubeadm reset pre-flight checks
Copy the code from the Master and paste it into Slaves nodes with append --v=5
Now get back to Master and execute
$ kubectl get nodes
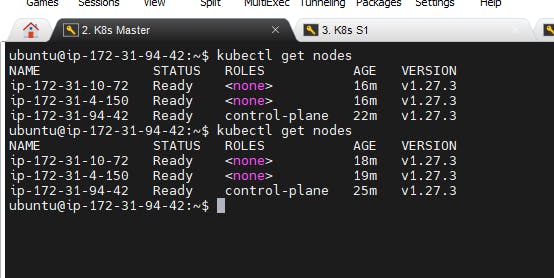
We have successfully installed the K8s Kubeadm cluster in our Machine and managed to join the slave nodes to Master.
Our next step is to create a Pod and run on those Nodes.
Create one Deployment file to deploy a sample todo-app on K8s using "Auto-healing" and "Auto-Scaling" feature.
Step 1: Starting a K8s Multinode Cluster (Kubeadm)
To run any deployment.yaml file in the K8s cluster, we need to have an image created and stored in the docker hub
Let us start on how to create an image and push it to the docker hub
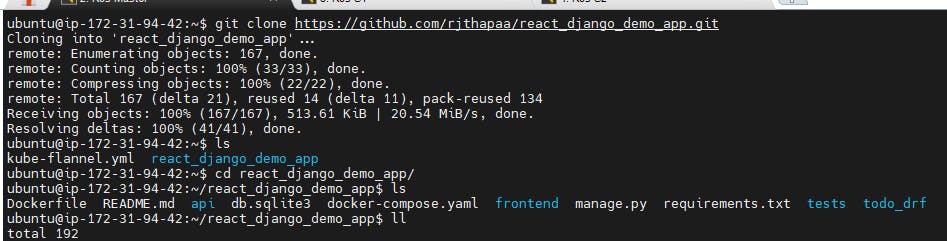
Clone a code from the git repo (react_django_demo_app)
$ git clone github.com/rjthapaa/react_django_demo_app.git
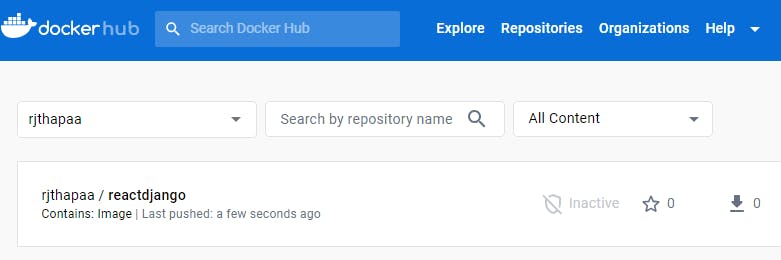
Create an image using the docker build command with the docker tag
$ docker build . -t rjthapaa/reactdjango
$ docker login
$ docker push rjthapaa/reactdjango
With these commands Image named react_image is created and pushed in docker hub repo
On Master Node
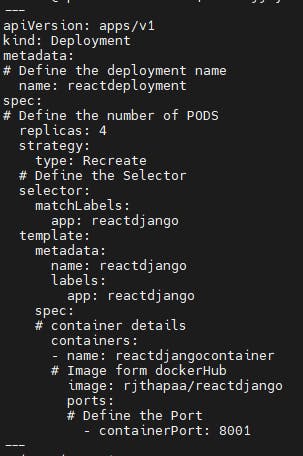
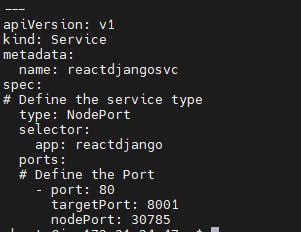
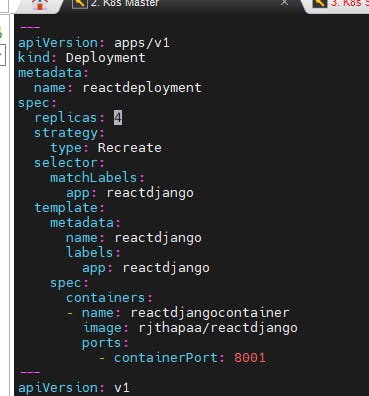
Let's first create a simple deployment.yaml file with 2 replicas. Like any other Kuberbnetes configuration, a deployment file will contain:
apiVersion represents the version of our api v1,v2,v3…
kind represents what is the purpose of the manifest file
metadata represent data about the labels
spec represents specification (what you want to use for this manifest)
$ cd react_django_demo_app
$ vi deployment.yml
https://github.com/rjthapaa/react_django_demo_app/blob/main/deployment.yaml
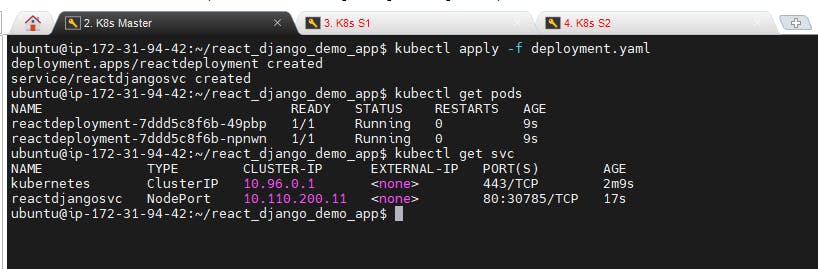
$ kubectl apply -f deployment.yml
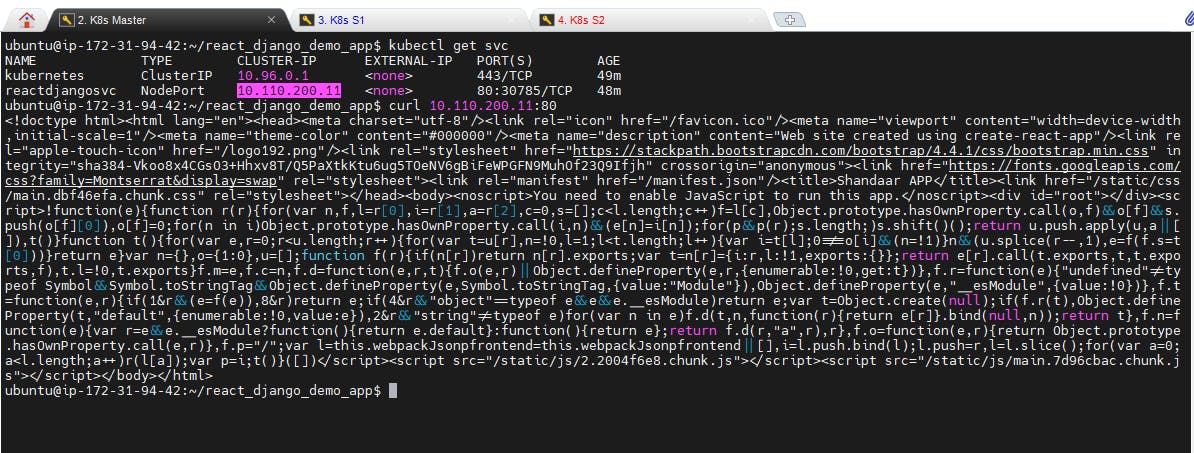
$ kubectl get pods$ kubectl get svc
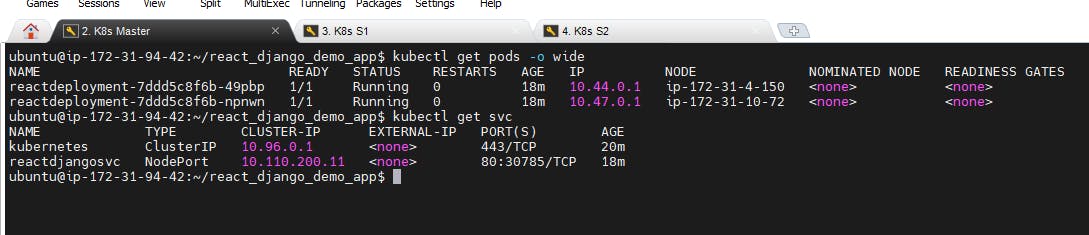
$ kubectl get pods -o wide
Shows us on which instance the Pods are running
$ kubectl describe pod <podname>
Describe the particular pod
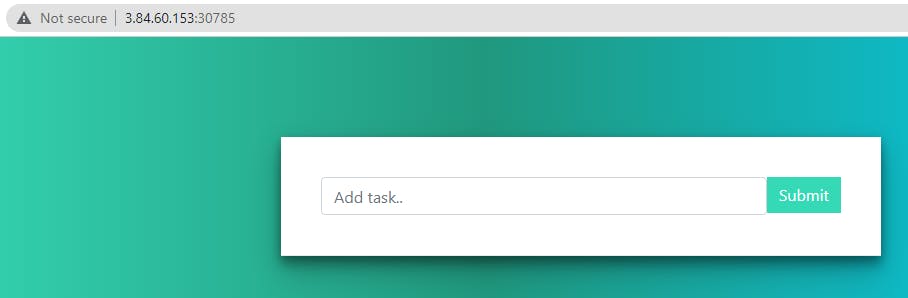
Access the Reactdjango app by using MasterorslavePublicip:30785
You can also access it internally within the cluster by using node port IP:80 in master or any of workers nodes.
Step 2: Auto Healing
Let us now try to delete a Pod and check if it can auto-heal or not
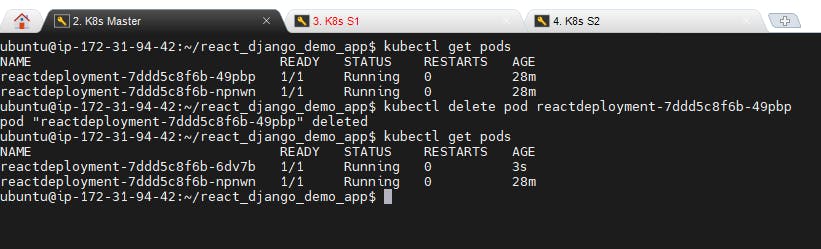
See the pod is deleted and a new pod is running ...
Step 3: Auto-Scaling
For auto-scaling, go and edit the deployment.yml file
$ vi deployment.yml
Change the replica count to 4
$ kubectl apply -f deployment.yml
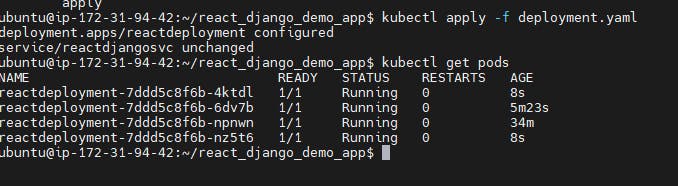
We got 4 pods running now.
To delete the all the deploy and service use below commands
kubectl delete deployment <deployment name>
kubectl delete service <service name>
kubectl delete all -all